‘Craft Challenges’ Category

  1. 12 Tags of 2014 – December

    31st December, 2014 by iGirlZoe

    I was so busy loving every moment of December that I almost missed out on completing a full set of this years 12 tags of 2014. I spent the final day of the year getting inky in order to complete it.

    Tim Holtz 12 Tags of 2014 December
    I used the vintage globe die as I think a about my friends and family overseas at this time of year.

    Tim Holtz 12 Tags of 2014 December
    I have really enjoyed making these tags. A big THANK YOU to Tim for taking time to creatively inspire us each month and thanks for taking a look at my take on December’s tag. You can see this months tag and techniques on Tim’s blog and you can see the post in French on Scrapdeco’s blog.

    Happy New Year, I hope 2015 is everything you could wish for.

    ~

    supplies: tim holtz; surfaces (manilla tag/grungeboard/shrink plastic/core-dinations kraft core)/distress ink (stormy sky, tumbled glass, salty ocean, vintage photo, peeled paint, walnut stain)/distress stain spray (tumbled glass, stormy sky, brushed pewter)/distress paint (picket fence)/idea-ology (crinkle ribbon)/dies (holiday words: script, holiday words: block, tag & bookplates, vintage globe, tapered fringe, festive greenery)/stamps (#207 Christmas Nostalgia)/tools (water mister, sanding grip, blending tool, paper distresser)
    other: archival ink (jet black)/glossy accents/glue n seal/heat tool


  2. Layered Snowflake Christmas Card

    25th November, 2014 by iGirlZoe

    Hello. I’ve spent another weekend preparing for Christmas, which probably seems a little enthusiastic to some, but for me this year is necessary. Road trips to the UK and France, visits to friends and family, shopping, house guests, crafting, Christmas! The to do list is endless… I actually have a list of lists I still need to make!

    Layered Snowflake Christmas Card
    With that in mind, I’ve been so grateful for all the festive challenges in the blogosphere. They’ve encouraged and inspired me to get going early this year, which has been so helpful. Today’s card has been inspired by 2 challenges in particular, Tim Holtz 12 tags of 2014 and Scrapdeco Christmas card challenge.

    I made a tag for this month’s 12 tags of 2014 at the beginning of the month and I used the same design for this card. I incorporated the techniques from this month’s 12 tags and Scrapdeco Maura’s pleated card challenge, to create this card.

    Tim Holtz Paper Snowflake Die
    I covered a snowflake from the new paper snowflakes die with brushed pewter distress paint and allowed to air dry. I then dropped alcohol ink on top, letting the ink wick unevenly. Once dry I dabbed a little gathered twigs distress ink on to give a gold tinge.

    Tim Holtz Paper Snowflake Die
    This started out as an experiment with distress products, but I’m really pleased with the results and I love the metallic foiled look.

    Tim Holtz Alphanumeric Dies
    I was trying out my new alphanumeric die set, which I used to create the “snow” word band on the front of my card. I cut a stencil using the alphanumeric dies and covered the back of the die cut with brushed pewter distress paint, allowing to partially dry. Whilst still wet enough for paint to transfer but not splodge, place paint side down onto white card and with a piece of paper over the top, gently rub over the entire word band. Then remove paper, peel away stencil and you’re left with a stencil transfer. I am going to have SO much fun with these dies!

    Layered Snowflake Christmas Card
    Thanks for stopping by my blog and don’t forget to check out the following challenges:

    Tim Holtz – 12 Tags of 2014 November
    Scrapdeco – Christmas Card Challenge
    Inspiration Emporium – Happy Holidays

    ~

    supplies: tim holtz; manilla cardstock/corrugated cardboard/distress glitter (clear rock candy)/alcohol ink (cloudy blue)/distress ink (tumbled glass, gathered twigs)/distress paint (picket fence, tumbled glass, stormy sky, weathered wood, salty ocean, faded jeans, iced spruce, brushed pewter)/idea-ology (snowflake adornments)/dies (layered snowflake, holiday word script, paper snowflakes)/tools(sanding block, mini blending tool)
    other: embossing ink/glossy accents/glue n seal/sticky powder/heat tool


  3. Let it snow

    21st November, 2014 by iGirlZoe

    Hello again. Almost weekend time and I’m excited to share my second contribution for the Christmas card challenge over at Scrapdeco.

    Tim Holtz Layered Snowflake Card
    My challenge this time is to create a Christmas card making a snowflake the focal point of your card. This wasn’t difficult using the new Tim Holtz layered snowflake die. I can’t even begin to tell you how much I LOVE this die!

    Tim Holtz Layered Snowflake Card
    To see and take part in the Christmas card challenge, hop over to Scrapdeco, (the blog is in French but there is an option on the right to change the language).

    Thanks for taking time to look at my card and if you would like to see my first card for this challenge it’s here. Have a great weekend.

    ~

    supplies: tim holtz; surfaces (manilla cardstock, grungeboard, shrink plastic, core-dinations kraft core)/distress ink (tumbled glass, stormy sky, iced spruce, salty ocean, vintage photo, gathered twigs, walnut stain)/distress paints (picket fence, antique linen)/distress glitter (clear rock candy)/dies (holiday words: script, paper snowflakes, layered snowflake, beaded garland & snowflake texture folder, postage stamp frame)/idea-ology (christmas word bands, gumdrops, crinkle ribbon)/Tools (paper distresser, sanding block, water mister)
    other: embossing ink/sticky embossing powder/glossy accents/scor-tape


  4. Christmas Gift Tags

    20th November, 2014 by iGirlZoe

    Hello everyone. I don’t know about you, but this week is flying by! Today I want to share some gift tags that I’ve been making for Christmas. In previous years I have shamefully bought my gift tags, but this year I’ve been inspired by Paula Cheney’s Mini Handwritten Holidays to make my own.

    Tim Holtz Blueprints Christmas Tags
    These gift tags are simple to make, customisable to your wrapping paper and add a really personal touch to your gift.

    Tim Holtz Blueprints Christmas Tags
    Here’s a step by step to show how I made the blueprints stamp toppers:

    1: stamped pinecone from the Tim Holtz mini blueprints 7 stamp set onto distress watercolor cardstock with jet black archival ink and gathered supplies, (distress markers, paintbrush, water mister).
    2: colouring directly onto a craft mat with distress markers and lightly misted with water and watercoloured directly from craft mat.
    3: colour washed around the pinecone using pumice stone and stormy sky to give it a nice icy blue background.
    4: using the distress marker spritzer, spritzed a little gathered twig over the design.
    5: added a little glossy accents to parts of the pinecone.
    6: sprinkled clear rock candy distress glitter over the design, shaked off excess and returned to pot. set aside to air dry.

    Tim Holtz Blueprints Christmas Tags
    You only need a few products to make these toppers, so I am putting together a small travel craft kit to take with me to the UK next month to make some while I’m away. I can’t think of anything more relaxing after a hectic day of Christmas shopping than some adult colouring time. πŸ˜‰

    Tim Holtz Blueprints Christmas Tags
    I was inspired by the All Sewn Up challenge over at A Vintage Journey to stitch directly onto the tag to give an effect of the bells hanging from the word “merry”.

    Tim Holtz Blueprints Christmas Tags
    Finally, don’t forget to check out Inspiration Journal’s Happy Holidays challenge which is running all month.

    Thank you for taking time to stop by my blog, I appreciate it. πŸ™‚

    ~

    supplies: tim holtz; white cardstock/distress watercolor cardstock/coredinations kraft core/merriment paper stash/distress ink (gathered twigs)/distress markers (stormy sky, pumice stone, vintage photo, gathered twigs,fired brick,mowed lawn, peeled paint, forest moss, wild honey)/distress stains (pumice stone, stormy sky, fired brick, brushed pewter, tarnished brass)/distress glitter (clear rock candy)/crinkle ribbon/dies (framelits: tag collection, holiday words: script, holiday greens)/stamps (mini blueprints 7 #203, christmas nostalgia #207, handwritten holidays 1 #208)/distress marker spritzer/
    other: archival ink (jet black, cornflour blue, leaf green, red geranium, potting soil)/glossy accents/scor-tape/water mister/paint brush/sewing machine


  5. Twinkle Twinkle Little Star…

    17th November, 2014 by iGirlZoe

    Hello everyone. Firstly, thank you so much for the lovely comments on my Skating towards Christmas card, it’s been great to connect with other crafters and see what you’re creating.

    I spent the weekend making more Christmas cards. This year I’m making a different card for each person I send to. It’s giving me a chance to use more of my Christmas stash as well as using lots of the techniques and new products I’ve picked up this year.

    Twinkle Twinkle Little Star Card
    This card was inspired by several challenges that I mixed together in one card, (Gold/Stars/Tim Holtz altered cabinet card pocket).

    I took “altered” in the literal sense and inked, sanded, scratched, stamped and distressed my card pocket. I LOVE the background stamp from one of this years Christmas stamp sets by Tim Holtz. It’s so vintage and such an easy stamp to create a repeat pattern with, as I did on my cabinet card.

    I embossed manilla cardstock with a star folder and covered in a layer of tarnished brass distress paint. The distress paint is reactive with water when wet so I misted and let the paint run over the embossed stars. Once dry I sanded the top layer to make the embossed stars pop.

    Compendium of Curiosities 3, Challenge 15
    I die cut the small tim holtz 3D star and ran through my sewing machine with gold thread. I distressed some core-dinations kraft core cardstock and gave that the gold thread treatment. Seriously, if you thought I was obsessed with my sewing machine before, you should see me now I’ve got GOLD THREAD!!! πŸ˜‰

    I folded the star into it’s 3D shape and attached to the front of the card with a dab of glossy accents. Afterwards I thought I could hang the star and make it detachable for the recipient to hang on their Christmas tree. I also had another idea about how to utilise the pocket part of the cabinet card pocket. I will have another post later in the week.

    Thanks for taking time to look at my card.

    ~

    This card was inspired by these challenges:

    Scrapdeco Christmas Card Challenge – Gold card
    Simon Says Stamp Wednesday Challenge – We’re Seeing Stars
    Inspiration Emporium Monthly Challenge – Happy Holidays
    Compendium of Curiosities 3 Challenge 15 – Cabinet Card Pocket

    Inspiration Emporium are generously sponsoring CC3 challenge 15 with a $50 gift certificate to the lucky winner!

    If you don’t already have the Compendium of Curiosities 3 book, you can order a signed copy directly from Tim.

    ~

    supplies: tim holtz; mini cabinet card/manilla cardstock/core-dinations kraft core/mini distress inks (vintage photo, gathered twigs)/distress paint (tarnished brass)/distress glitter (clear rock candy)/die (3D star, holiday words: script)/stamp set (christmas nostalgia #207)
    other: archival ink (jet black)/glossy accents/scor-tape/star embossing folder/sewing machine/gold thread


  6. Dear Santa, I can explain…

    7th November, 2014 by iGirlZoe

    Tim Holtz Vintage Typewriter Christmas Card
    Last year I took part in “November’s card a day” on Scrapdeco’s blog. This year I was delighted to be asked to make a couple of cards for the challenge. I’m excited to share my first card with you.

    My challenge is to create a Christmas card using a wax seal and a non Christmas themed die, (I used the Tim Holtz Sizzix Vintage Typewriter).

    To see and take part in the Christmas card challenge, hop over to Scrapdeco’s blog. (The blog is in French, but there is an option on the right to change the language).

    I hope you have a great weekend.

    ~

    supplies: tim holtz; watercolor card/grungeboard/core-dinations kraft core/distress ink (antique linen, vintage photo, walnut stain)/distress marker (gathered twigs)/distress stain (black soot, brushed pewter)/dies (vintage typewriter, holiday greens, holiday words: script)/embossing folders (winter berries)/stamps (going somewhere #90)/ tools (sanding block, blending tool, distress marker spritzer)
    other: archival ink (jet black, red geranium)/glossy accents/stamps (7G – christmas greetings)/red adhesive gems/sealing wax & wax seal


  7. 12 Tags of 2014 – November

    4th November, 2014 by iGirlZoe

    Tim Holtz 12 Tags of 2014 November
    My take on November’s 12 Tags of 2014 is less warm hues and more icy blues, but I used all the techniques Tim shared. I love love loved using the corrugated cardboard, it will be such a great way to use up Christmas delivery boxes.

    Tim Holtz 12 Tags of 2014 November
    I can’t properly convey in words my love for the holiday word script dies. They’re connected really sensibly and actually take quite a lot of altering punishment.

    Tim Holtz 12 Tags of 2014 November
    I am going to make some more of these in a Christmas card format. I’m keeping the cardboard snowflakes to decorate and use separately in a home decor project.
    It’s the most wonderful time of the year… πŸ™‚

    Thanks for taking a look at my tag and take time to hop over to Tim’s blog to see this month’s tag and techniques. If you would like to see the post in French, hop over to Scrapdeco’s blog.

    ~

    supplies: tim holtz; manilla tag/corrugated cardboard/distress glitter (clear rock candy)/distress ink (tumbled glass, walnut stain)/distress paint (picket fence, tumbled glass, stormy sky, weathered wood, salty ocean, faded jeans, iced spruce)/distress stains (tumbled glass, stormy sky, brushed pewter)/idea-ology (crinkle ribbon, tinsel twine silver, snowflake adornments)/dies (layered snowflake, holiday word script)/tools(sanding block, mini blending tool)
    other: embossing ink/glossy accents/glue n seal/sticky powder/heat tool


  8. Matchbox Halloween Collage

    31st October, 2014 by iGirlZoe

    Tim Holtz Matchbox Halloween Collage
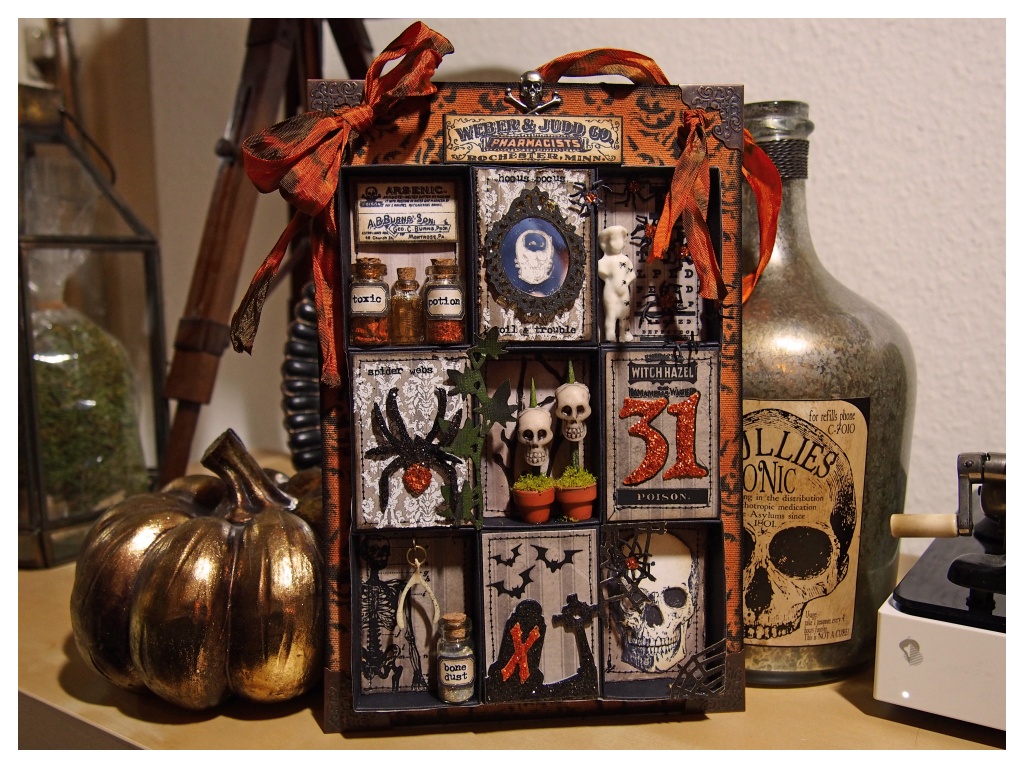
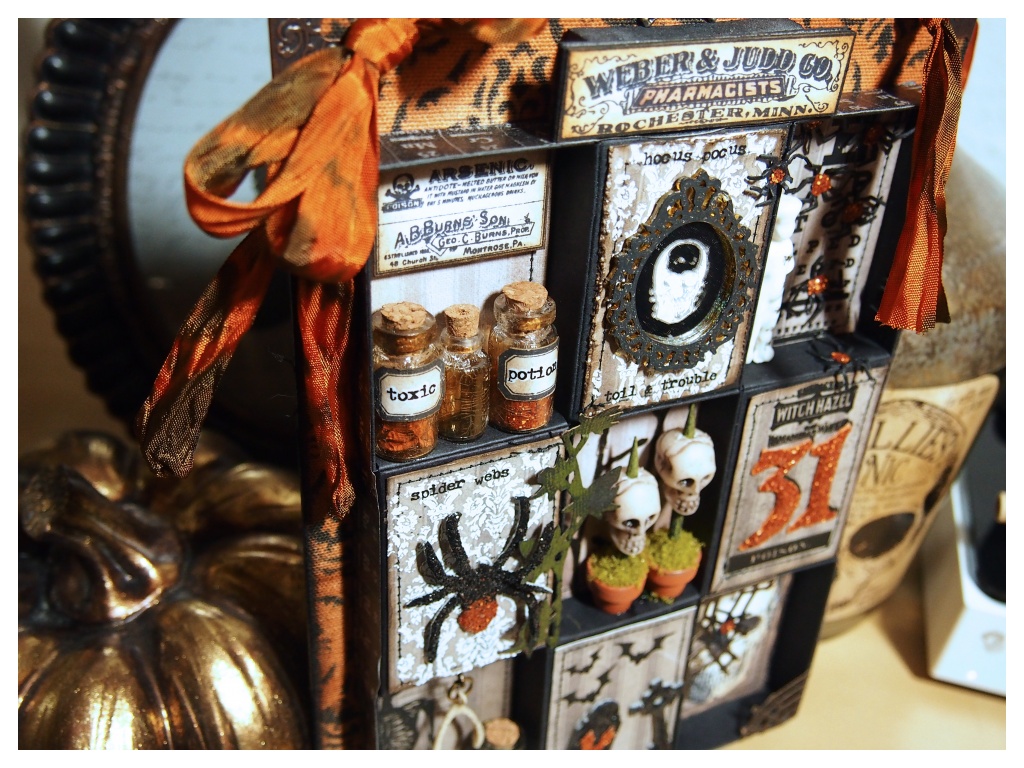
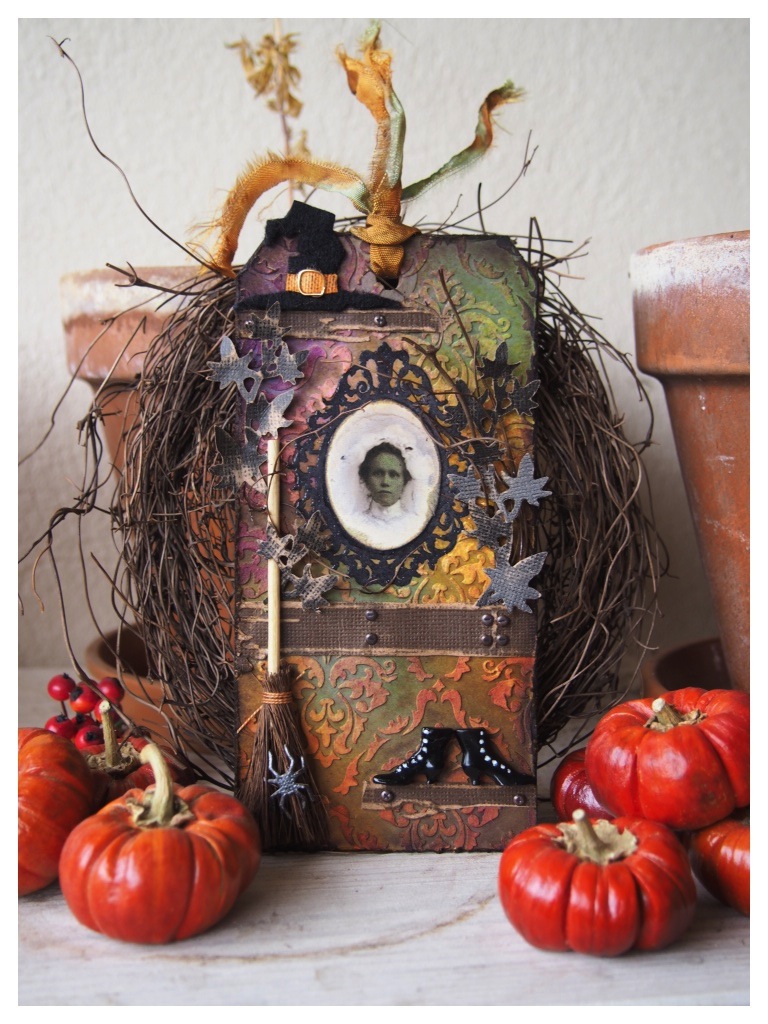
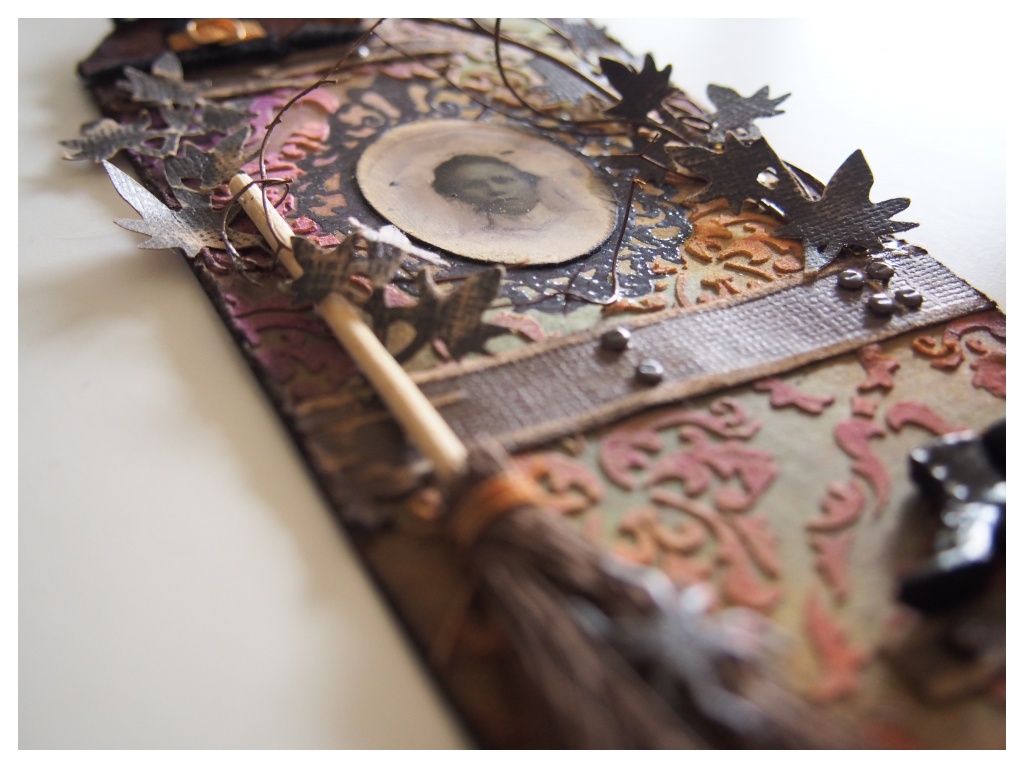
    Paula Cheney created a wonderful Matchbox Halloween Collage using the Tim Holtz Sizzix matchbox die and posted a really detailed tutorial. I decided to try making one of my own with splashes of rusty hinge to compliment the oranges and browns in my autumnal home decor.

    Tim Holtz Matchbox Halloween Collage
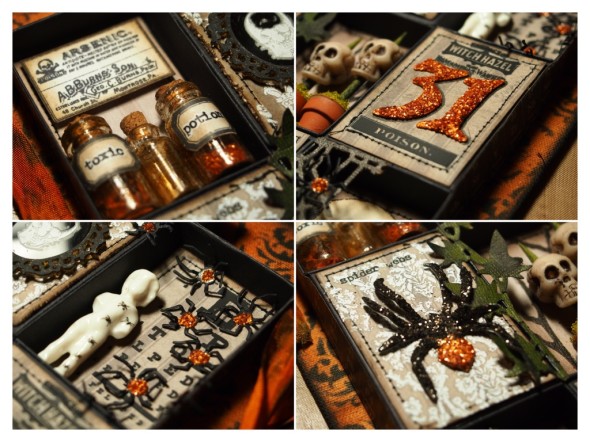
    I accidentally broke one of the miniature terracotta pots so used my texture hammer to finish the job and break it into pieces small enough to slip into one of the bottles. The other I filled with a little rusty hinge distress glitter and the middle bottle was crackled glazed and inked.

    Tim Holtz Matchbox Halloween Collage
    I tried to incorporate orange into each section to get the cohesion through colour that Paula mentions in her tutorial. This is a great project to get your seasonal dies out and stretch their legs.

    Tim Holtz Matchbox Halloween Collage
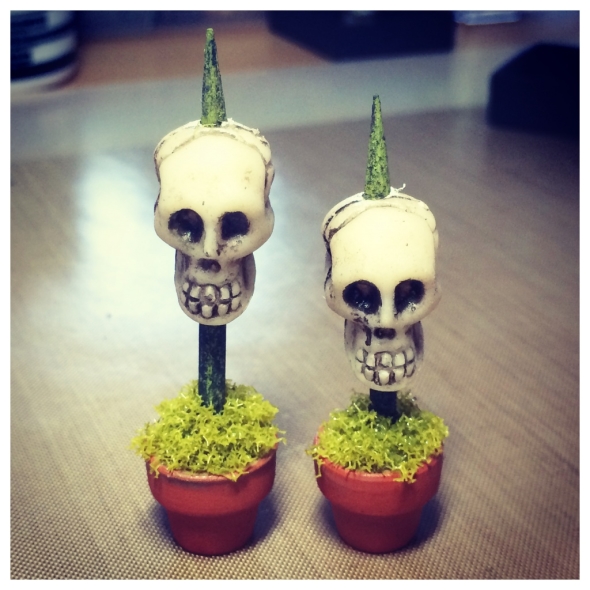
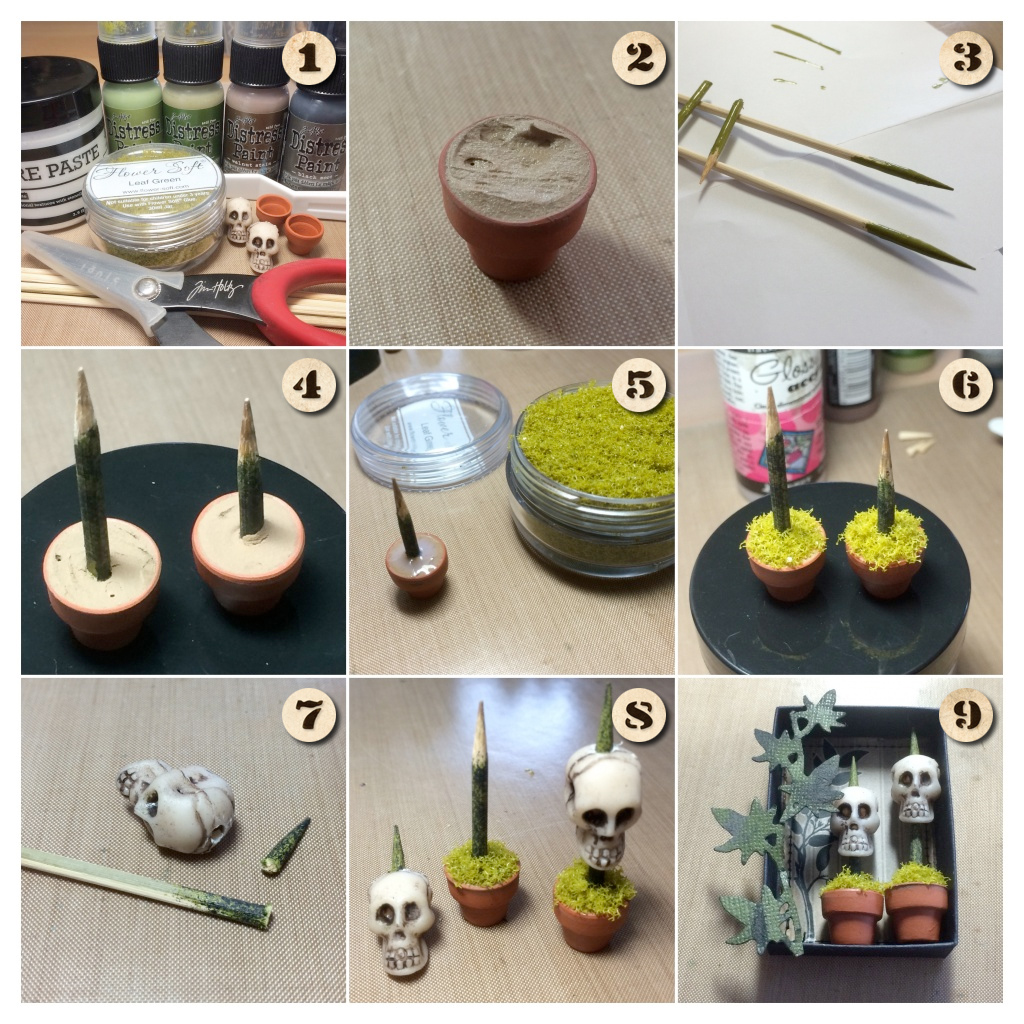
    I made these miniature potted skulls in real terracotta plant pots and photographed a step by step to show how.

    Tim Holtz Matchbox Halloween Collage
    1. supplies used: texture paste & tool /distress paints/snips scissors/flower soft/wood skewers/miniature terracotta pots/miniature skulls (repurposed from a halloween bracelet).
    2. mix a little texture paste and distress paint on your craft mat and scrape into the terracotta pot using a spatula or lollypop stick. set aside to start drying.
    3. paint the pointed ends of 4x wood skewers with peeled paint distress paint and then dab the darker forest moss over the top to give a mottled effect. set aside to dry for a few minutes.
    4. before the texture paste dries completely, trim 2x wood skewers to different lengths and gently push into the centre of the pots.
    5. once the texture paste is completely dry, cover the top of the top with glossy accents and apply flower soft or faux/real moss. set aside to dry.
    6. sit and watch your pots drying while resisting the urge to touch them. πŸ˜‰
    7. cut the remaining 2x wood skewers and push into/glue onto the top of the skull.
    8. very very carefully push/glue the skull into/onto the stick in the pot.
    9. glue the pots onto the bottom of a matchbox and sprinkle flower soft or moss onto any glue that squeezes out from underneath them to give it an organic look.

    Tim Holtz Matchbox Halloween Collage
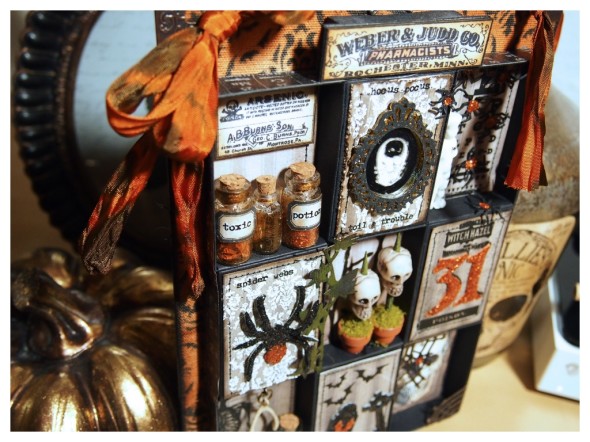
    Thanks for taking time to look at my Matchbox Halloween Collage and be sure to check out Paula’s tutorial posted on Tim’s Blog. I plan to make a Christmas themed one next, but for now, I hope you have a Happy Halloween.

    Before the clock strikes pumpkin hour, I am entering a couple of online challenges:

    Simon Says Stamp Wednesday Challenge – Anything Goes
    Inspiration Emporium Monday Challenge – In Disguise (matchboxes)
    Sizzix – Halloween Challenge

    (Sizzix Dies Used)
    Tim Holtz Matchbox Bigz
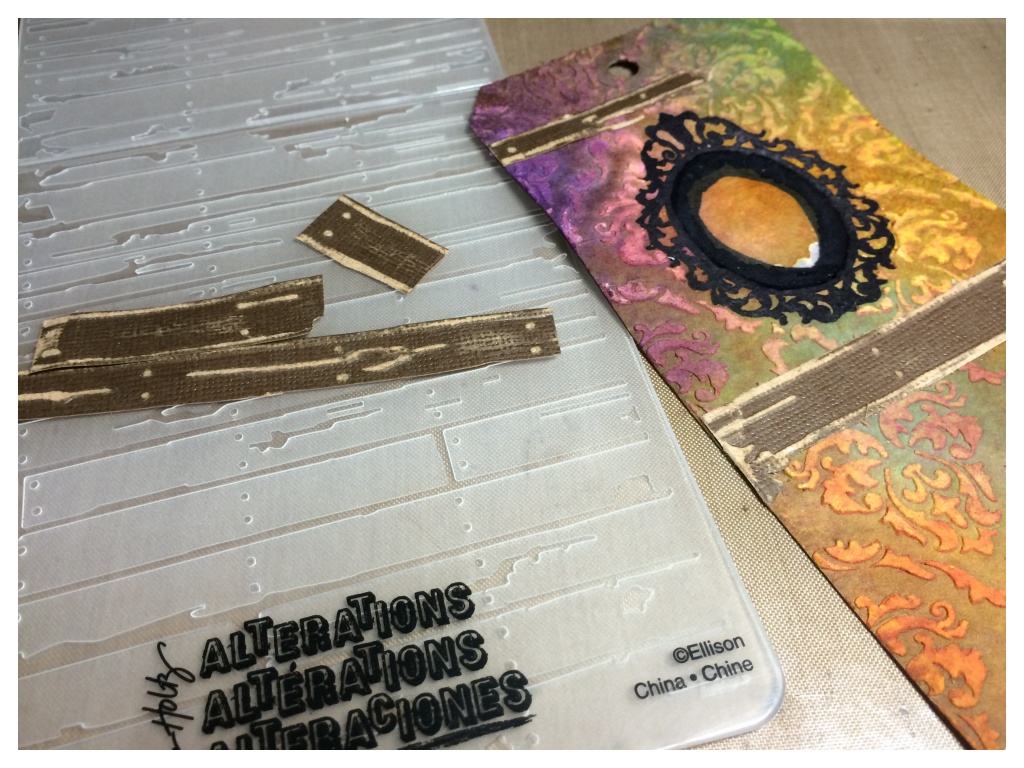
    Tim Holtz Spring Greenery Decorative Strip
    Tim Holtz Mini Spider & 31 Movers & Shapers
    Tim Holtz Cobwebs Decorative Strip
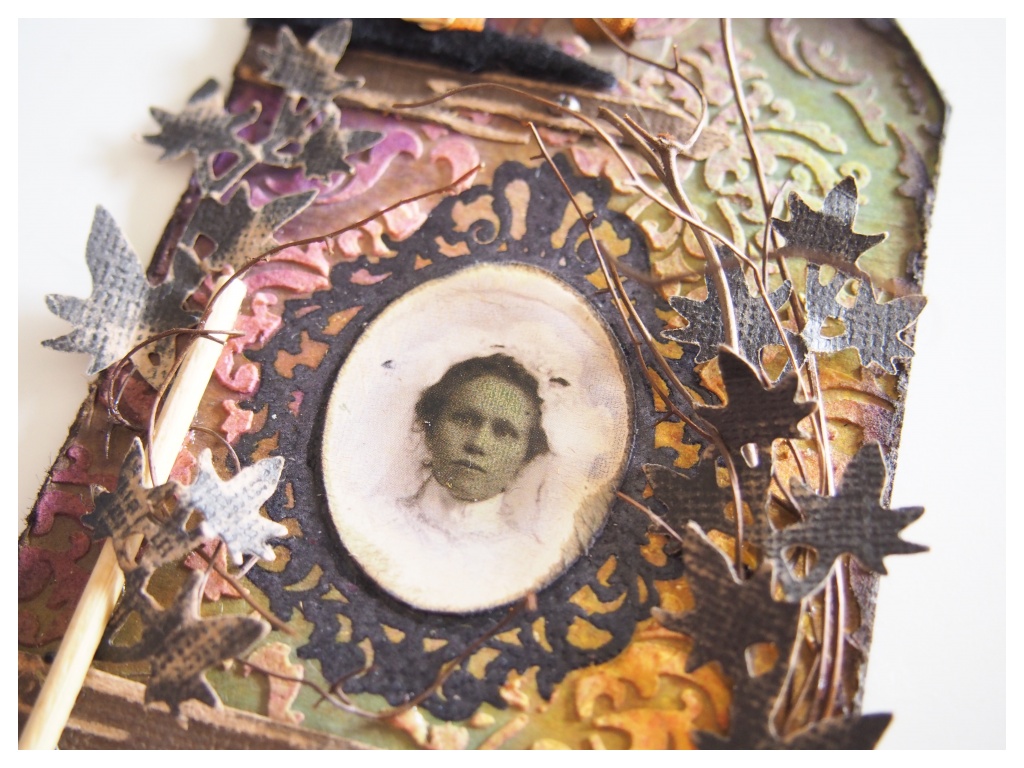
    Tim Holtz Ornate Frame Bigz
    Tim Holtz Graveyard On The Edge
    (there’s a theme here) πŸ˜‰

    ~

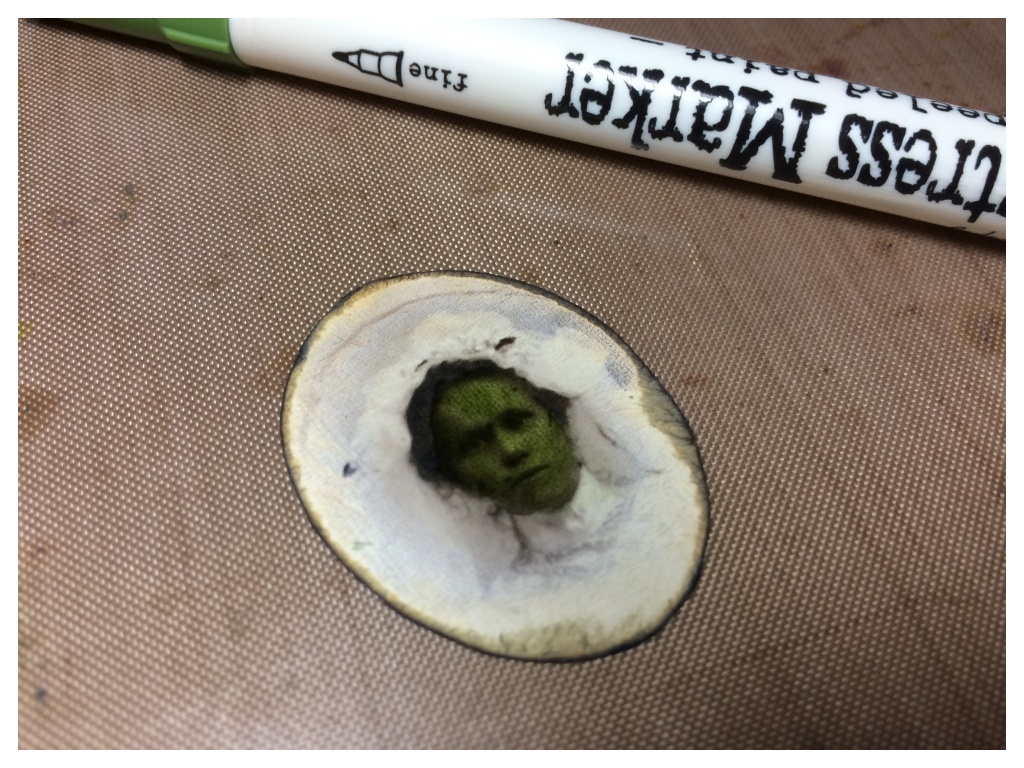
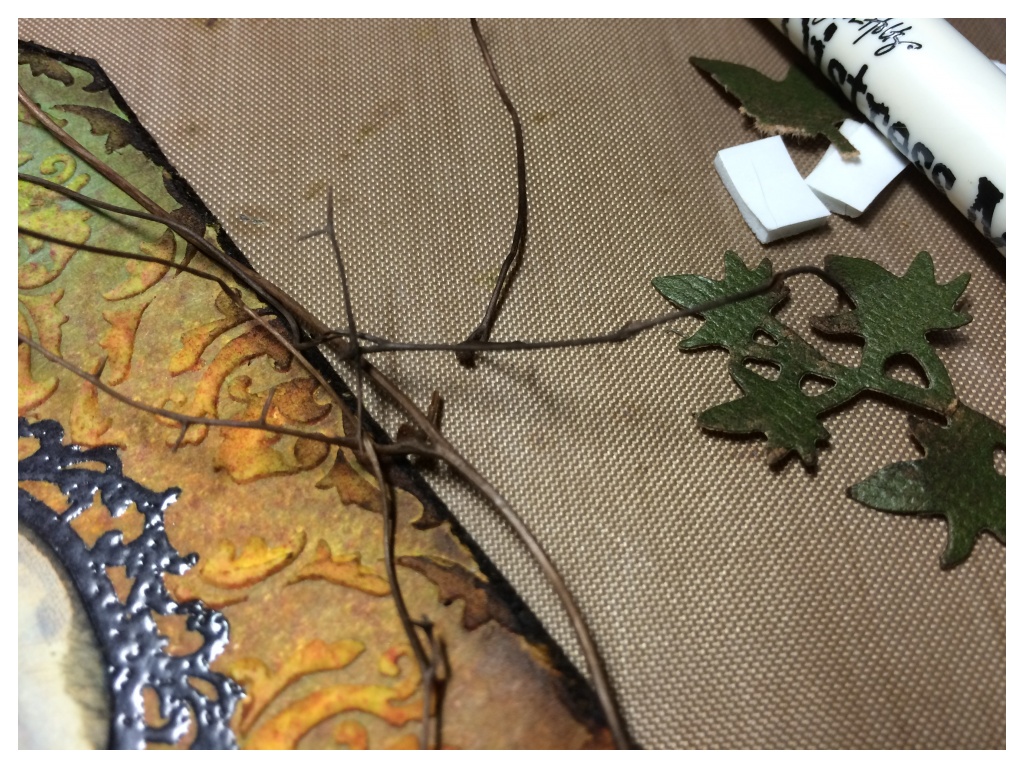
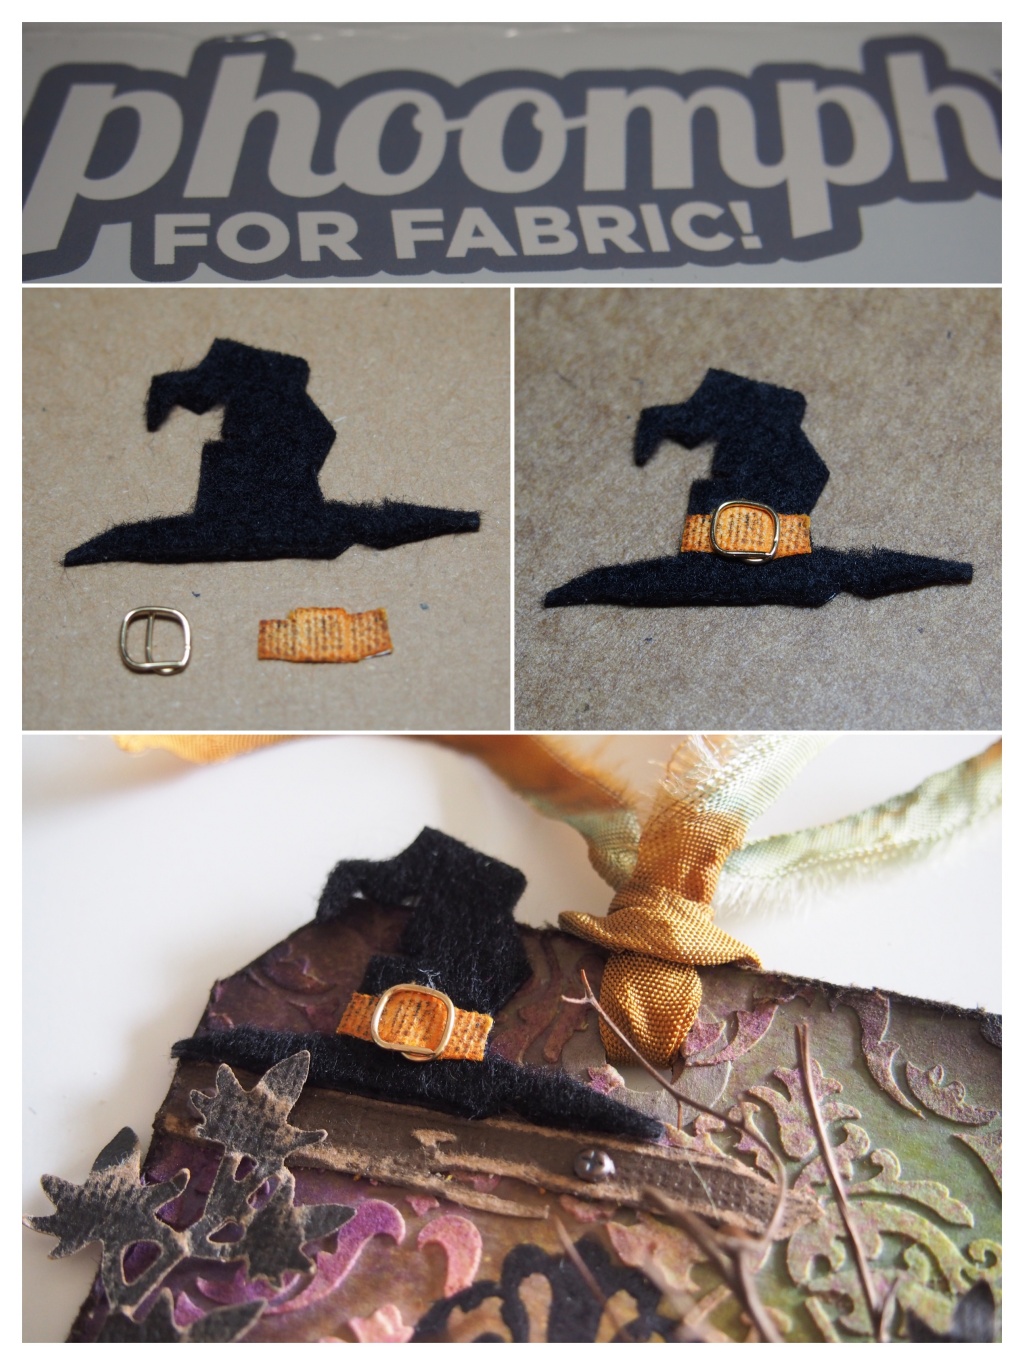
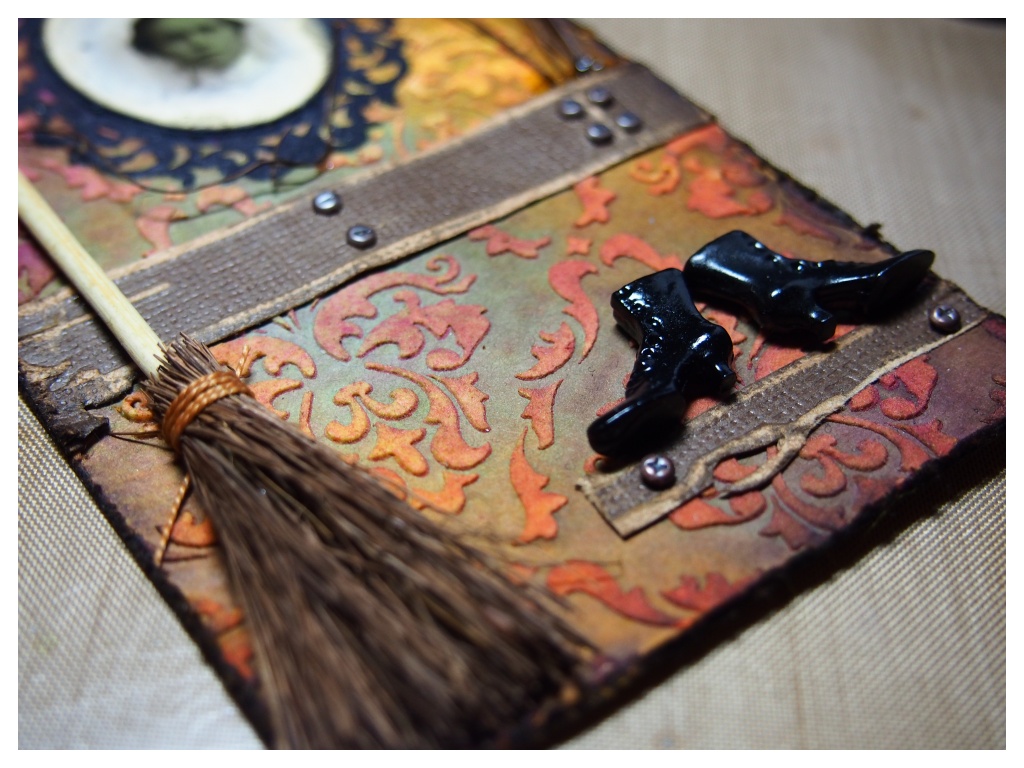
    Supplies: tim holtz; dies (matchbox, ornate frame, mini spider & 31, graveyard, cobwebs, spring greenery)/surfaces (cardboard, grungeboard, manilla cardstock, mirror card, shrink plastic, sticky back canvas)/distress inks (antique linen, rusty hinge, vintage photo, walnut stain, black soot)/distress stains (rusty hinge, black soot)/distress paints (rusty hinge, peeled paint, forest moss, walnut stain, black soot)/distress glitters (antique linen/rusty hinge/black soot)/distress crackle glaze/layering stencil (#26 gothic)/idea-ology (jump rings, screw eyes, wishbones, corked vials, fractured dolls, crossbones, corners, crinkle ribbon, adornment, apothecary remnant rubs, laboratorie tissue tape, menagerie paper stash)/stamps (#140 mini halloween 3, #198 mini halloween 4).
    other; glossy accents/archival ink (jet black)/archival ink re-inker (potting soil)/sewing machine/heat tool.


  9. Card Making Monday : Layered Leaf

    16th October, 2014 by iGirlZoe

    resize_13383340_1024px
    My local craft store, Scrapdeco, has a Card Making Monday blog challenge. The challenge is to make a card suitable for any occasion, that can be altered in a few minutes by adding a greeting when required.

    Tim Holtz Layered Leaf
    I have been dying to try out the new Tim Holtz Sizzix alterations layered leaf die and was really inspired by Richele Christensen’s Autumn Wreath tutorial.

    Tim Holtz Layered Leaf
    I went with quite a muted background to allow the colours on the leaf to really pop. I used lots of texture to compliment the lovely embossed feature of the leaf. I layered a piece of the Tim Holtz Eclectic Elements fabric and paper from the 8×8 menagerie paper stash onto burlap and put them through my sewing machine. It’s hard to believe that at the beginning of this year I was sewing machine phobic!

    Tim Holtz Layered Leaf
    I added a bit of gold leaf… just because why not. πŸ˜‰

    Thanks for taking time to check out my card and I hope you’re having a nice Autumn wherever you are.

    ~

    supplies: tim holtz; manilla cardstock/die (layered leaf)/distress ink (gathered twigs)/distress marker (gathered twigs)/distress marker spritzer tool/distress stains (scattered straw, wild honey, aged mahogany, peeled paint, antique bronze, tarnished brass)/idea-ology (menagerie paper stash)/eclectic elements fabric
    other: burlap, sewing machine, kraft cardstock, gold leaf


  10. 12 Tags of 2014 – October

    13th October, 2014 by iGirlZoe

    Tim Holtz 12 Tags of 2014 October
    I love this time of year and was inspired by the gothic #26 layering stencil to create a witches boudoir for my October 12 Tags of 2014. The gothic stencil reminds me of wallpaper and it seemed fitting for the background of somewhere a witch could hang up her broomstick and hat. πŸ˜‰

    Tim Holtz 12 Tags of 2014 October
    Tim’s wood planks texture fades folder is perfect for creating some faux wood shelves.

    Tim Holtz 12 Tags of 2014 October
    I colour tinted one of Tim’s found relative cards with distress marker to create the photo for a boudoir wall hanging.

    Tim Holtz 12 Tags of 2014 October
    I attached some fine twigs to give a wild and withered look to the tag. This was so fiddly, but the glossy accents held them in place, I LOVE this adhesive, it’s one of my most used products.

    Tim Holtz 12 Tags of 2014 October
    I used ivy from the spring greenery decorative strip die, intertwined with the twigs and using the leaves to cover the blobs of glossy accents I had used to secure the twigs.

    Tim Holtz 12 Tags of 2014 October
    I tried out Tammy Tutterow’s felty witchy hat using felt and phoomph for fabric. Be sure to check out her awesome tutorial.

    Tim Holtz 12 Tags of 2014 October
    I picked up this miniature broomstick and witchy shoes from a tiny shop in Gruyere, Switzerland selling all things miniature. You could easily make this broomstick with a BBQ skewer, some fine twigs and a hot glue gun.

    Tim Holtz 12 Tags of 2014 October
    This place is amazing for all things miniature. I sent my friend, Sue, a few bits I picked up for her here and she made the most creative Basket Gnome Garden.

    Tim Holtz 12 Tags of 2014 October
    Thanks for taking a look at my “Witches Boudoir” tag and take time to hop over to Tim’s blog to see this month’s tag and techniques. If you would like to see the post in French, hop over to Scrapdeco’s blog.

    ~

    supplies: tim holtz; manilla tag/core’dinations kraft core/layering stencil (gothic #26)/distress ink (walnut stain)/distress paint (brushed pewter)/distress marker (peeled paint)/distress sprays (wild honey, rusty hinge, dusty concord, peeled paint)/idea-ology (crinkle ribbon, mini fasteners, found relative cards)/dies (spring greenery decorative strip, wood planks texture fades folder)/cling stamps (mini halloween 3 #140, mini blueprints 7 #203)/mini blending tool/grid blocks
    other: texture paste/clear embossing powder/archival ink (jet black)/glossy accents/sticky back canvas/felt/phoomph for fabric/twigs